A kisser button is a small accessory that makes a big difference in archery accuracy. This simple device attaches to your bowstring and contacts your lips at full draw. The consistent reference point it provides helps you achieve repeatable anchor positions shot after shot.
Many archers struggle with inconsistent shooting despite practicing regularly. Their groups spread randomly across the target. Often, the problem traces to anchor point variation. A kisser button solves this issue by providing tactile feedback that confirms proper positioning.
What Is a Kisser Button?
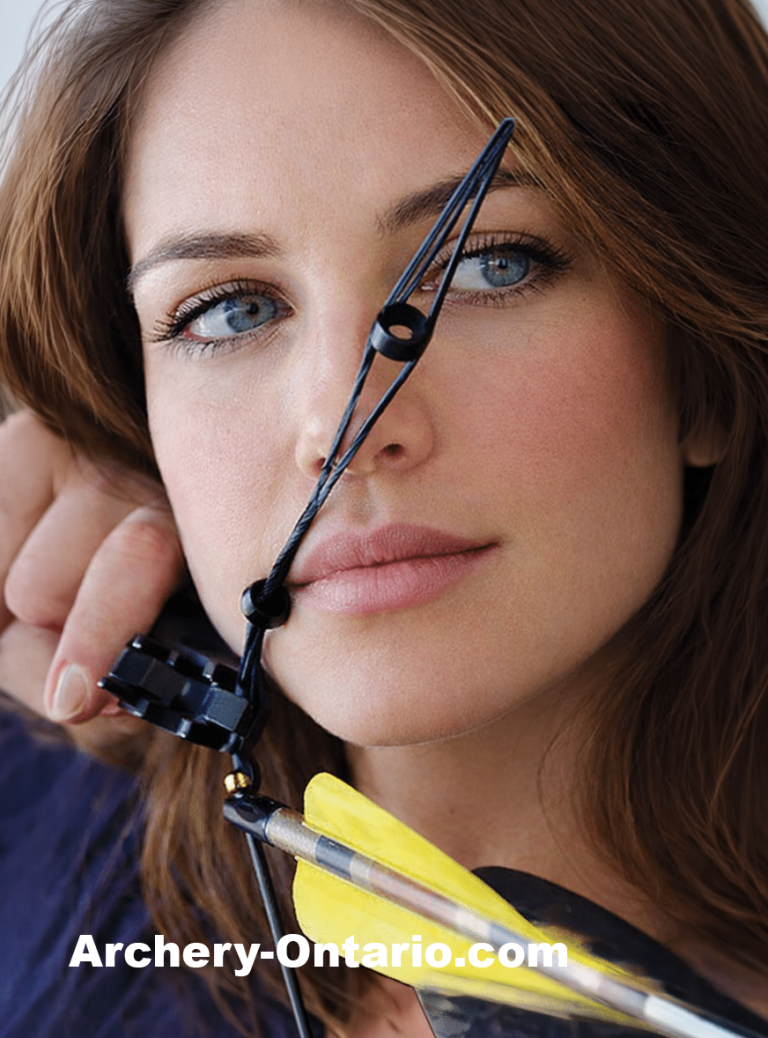
A kisser button is a small disc or cylinder that attaches to your bowstring. When you draw your bow, the kisser button contacts your lips or the corner of your mouth. This contact tells you that your anchor position is correct.
The concept behind the kisser button is simple. Humans perceive touch very accurately. When the kisser button touches the same spot on your lips every time, you know your head position and string alignment are consistent.
Kisser buttons have existed in archery for decades. Their effectiveness is proven through countless competitions and hunting successes. Despite their simplicity, many archers overlook this valuable accessory.
5 Simple Steps to Install Your Kisser Button
Installing a kisser button takes just minutes. Proper positioning is critical for effectiveness. Follow these steps to ensure your kisser button works correctly from the first shot.
Step 1: Gather Your Materials
You need the kisser button itself and a way to attach it. Most kisser buttons include installation hardware. Some require serving thread or rubber tubing for attachment.
Have your bow strung and ready to draw. You will need to find the natural contact point during installation. Drawing the bow multiple times helps identify the correct position.
Step 2: Find Your Natural Anchor Point
Draw your bow using your normal form. Pay attention to where the string naturally contacts your face. Note the position on your lips where consistent contact occurs.
Repeat this process several times. Verify that you find the same contact point each time. This location is where your kisser button will provide the most benefit.
Do not force your face to meet the string in an unnatural position. The kisser button should confirm your natural anchor, not create a new one. Forcing an unnatural position leads to discomfort and poor form.
Step 3: Mark the Position
Mark your bowstring where the kisser button will attach. Use a small piece of tape or a marker to identify the exact spot. This mark guides installation and ensures correct placement.
Measure from a fixed reference point on your string. This measurement allows you to recreate the position if needed. Record the measurement for future reference.
Step 4: Attach the Kisser Button
Install the kisser button according to its design. Crimp-on kisser buttons squeeze directly onto the string. Tie-on versions require serving or thread to secure them in place.
Ensure the kisser button attaches securely. It must not slide up or down during use. Any movement defeats the purpose of consistent positioning.
Orient the kisser button so its contact surface faces your lips. The flat or rounded surface should touch your mouth. Sharp edges should face away from your face.
Step 5: Test and Adjust
Draw your bow and verify kisser button contact. The button should touch your lips at the exact spot you identified earlier. Adjust position if necessary to achieve proper contact.
Shoot several arrows to confirm the kisser button position works during actual shooting. Static positioning sometimes differs from dynamic positioning. Fine-tune as needed based on real shooting results.
Benefits of Using a Kisser Button
The kisser button provides multiple benefits that improve your archery performance. Understanding these advantages helps you appreciate why this simple accessory matters so much.
Consistent Anchor Points
The primary kisser button benefit is anchor point consistency. Every shot starts from the same position. This repeatability eliminates a major source of accuracy variation.
Without a kisser button, anchor point depends on feel alone. Some days your feel is accurate. Other days it is not. The kisser button removes this uncertainty by providing physical confirmation.
Consistent anchors translate directly to consistent arrow impact. When your starting position is the same, your arrows go to the same place. Groups tighten immediately after adding a kisser button.
Improved String Alignment
The kisser button helps maintain proper string alignment with your eye. Correct alignment ensures your peep sight and front sight work together effectively. Misalignment causes aiming errors.
String alignment affects both horizontal and vertical accuracy. The kisser button confirms your head is positioned correctly for optimal sight picture. This alignment is especially critical for long-distance shooting.
Faster Anchor Acquisition
Finding your anchor point quickly helps with timed events and hunting situations. The kisser button provides immediate feedback when you reach the correct position. No searching or adjusting required.
Quick anchor acquisition also reduces fatigue. Less time at full draw means less muscle strain. You arrive at your anchor, confirm with the kisser button, and execute your shot efficiently.
Confidence Building
Knowing your anchor is correct builds confidence. Confidence improves shot execution. The kisser button provides this assurance before every release.
Competition archers value the confidence a kisser button provides. Under pressure, doubt creeps in easily. Physical confirmation from the kisser button counters this doubt.
Types of Kisser Buttons
Several kisser button designs exist to suit different preferences. Each type offers advantages for specific applications. Understanding the options helps you select the best kisser button for your needs.
Disc Kisser Buttons
Disc kisser buttons feature a flat, round contact surface. This shape provides broad contact area against your lips. Many archers find disc designs comfortable and easy to position consistently.
The flat surface of a disc kisser button works well for center-lip contact. The broad area provides clear tactile feedback. Positioning tolerance is relatively forgiving with this design.
Cylinder Kisser Buttons
Cylinder kisser buttons wrap around the bowstring. They provide contact along their length rather than at a single point. Some archers prefer the feel of this design.
Cylindrical shapes work well for corner-of-mouth contact. The elongated form matches the string-to-face angle at this position. Experiment with both styles to find your preference.
Tied Kisser Buttons
Some archers create kisser buttons from serving material. A small ball of thread serves the same function as commercial products. This approach allows precise customization.
Tied kisser buttons cost essentially nothing beyond the serving material. They can be positioned exactly where needed. However, they require more skill to create and may not last as long as commercial options.
Kisser Button Positioning Tips
Proper kisser button position is critical for effectiveness. Incorrect positioning provides false feedback that hurts rather than helps your shooting. These tips ensure optimal placement.
Match Your Natural Anchor
Position your kisser button to contact where your face naturally meets the string. Do not use the kisser button to change your anchor. It should confirm your existing position.
Forcing an unnatural anchor to meet a poorly positioned kisser button creates bad habits. Your form suffers when you contort to reach the button. Natural positioning is always better.
Ensure Clear Contact
The kisser button must make definite contact with your lips. Brushing contact or near-misses do not provide reliable feedback. Position the button to create unmistakable touch.
Adjust button position if contact feels uncertain. Move it slightly until you achieve clear, consistent contact. This clarity is the whole point of using a kisser button.
Account for Gear Changes
Adding or changing other equipment may affect kisser button position. A new release, different string, or adjusted draw length can all shift contact points. Recheck positioning after any equipment changes.
Verify kisser button position at the start of each season. Form changes over time, and positions that worked last year may need adjustment. Regular verification prevents accuracy problems.
Common Kisser Button Mistakes
Even simple accessories can be used incorrectly. Avoid these common kisser button mistakes to get the most from this valuable aid.
Position Too High or Low
A kisser button positioned incorrectly forces unnatural head angles. Tilting your head to reach the button affects your entire form. Position the button to match your natural head position.
Loose Installation
A kisser button that slides on the string provides inconsistent reference points. The whole purpose of the accessory is defeated if it moves. Ensure secure attachment during installation.
Ignoring String Rotation
Bowstrings rotate during the draw cycle. A kisser button may face the correct direction at brace but rotate away at full draw. Install with attention to where the button faces at anchor.
Over-Reliance
The kisser button aids consistency but cannot replace good form. Do not abandon proper technique because you have a kisser button. It supplements fundamentals rather than replacing them.
Kisser Button Maintenance
Maintaining your kisser button ensures continued reliable performance. These accessories require minimal care but should not be completely ignored.
Regular Inspection
Check your kisser button before each shooting session. Verify it remains securely attached and properly positioned. Catching problems early prevents accuracy issues.
Look for wear on the contact surface. A worn kisser button may not provide clear feedback. Replace worn units to maintain proper function.
Cleaning
Clean your kisser button periodically. Skin oils and lip products accumulate on the contact surface. A quick wipe with a clean cloth keeps the button sanitary and functional.
Replacement
Replace your kisser button when it shows significant wear or damage. These accessories are inexpensive and critical for consistency. Do not let a worn kisser button affect your shooting.
Keep spare kisser buttons in your archery kit. If one fails during an important session, you can replace it immediately. Preparation prevents problems.
Who Should Use a Kisser Button?
Most archers benefit from using a kisser button. Certain groups see particularly significant improvements from this accessory.
Beginners
New archers benefit tremendously from kisser button feedback. Learning proper anchor position is challenging without reference points. The kisser button accelerates this learning process.
Beginners who use a kisser button from the start develop consistent anchors faster. This consistency builds good habits that persist throughout their archery careers.
Accuracy-Focused Shooters
Archers pursuing maximum accuracy need every consistency advantage. The kisser button eliminates anchor variation that causes misses. Target competitors commonly use kisser buttons.
Hunters
Hunting situations demand quick, accurate shots. The kisser button helps hunters find their anchor instantly in high-pressure moments. One good shot often determines success or failure.
Archers with Inconsistent Groups
If your groups are larger than expected despite good practice, a kisser button may help. Anchor variation is a common cause of inconsistency. Adding this reference point often solves the problem.